Showing posts with label for. Show all posts

Monday, March 3, 2014

I made a handout for Mondays demo

In this case, I will give you a handout so you can pay attention to the demo without taking notes. Please read before Mondays class. I will make copies for everyone.

Shannon Wright

Woodworking 168
Project 1: Sample Joints
We are using 5/4 (Five Quarter) Poplar boards, 16 feet long.

Milling Your Wood on the Jointer and Planer

What you need:
Starrett combination square (never drop one of these!!!)
Two jointer-specific push sticks
Key to unlock the jointer “on” switch
Pencil for marking
Safety glasses or face shield

1) Cut a 36” length of poplar on the radial arm saw. Let’s save all the 48” pieces that remain, for another project.
2) Use the combination square to “square up” the fence of the jointer.
3) Set the infeed table to remove between 1/32” and 1/16”.
4) Assess “grain runout pattern”, cup and bow of your piece of wood, and joint one face using two push sticks designed for the jointer.
5) Move your whole body with the wood—do not stand in a fixed location and lean forward.
6) Put the letter “j” in pencil on the jointed face so you can identify it later.
7) Joint one edge of your piece of wood, considering the grain runout pattern to avoid tearout. Keep your wood very tight against the fence and do not rock the wood. Mark it with a “j”.
8) Measure the thickness of your wood at each end and set the thickness planer to 1/16” less than the thickest dimension
9) With the jointed side down, assess the grain runout direction by looking at the edge of your board.
10) Place your wood, with the jointed side down, into the planer. You will need to give it a solid push to engage the infeed rollers. Remove your wood as the rollers feed it out the other side.

Ripping Your Wood on the Table Saw
What you need:
Rip blade
Push stick
Yellow anti-kickback roller
Phillips-head screwdriver
Table saw arbor wrench
Starrett combination square
Safety glasses or face shield

1) Check that the power is off at the circuit breaker
2) Remove the table saw insert, then remove the nut and washer from the saw arbor and put the rip blade on, with the teeth facing you, making sure not to bang the blade against metal.
3) Put the washer on and tighten the nut.
4) Replace the blade insert
5) Raise the blade as high as it will go, and place the Starrett square tight against the right side of the blade. If you see light at the top or the bottom, adjust the blade tilt wheel below until no light is visible. Lower the blade.
6) Bring your wood up against the blade to set the height of the blade. Raise or lower the blade until it is ¼” or one carbide tooth’s height above your wood.
7) Lock the lock knob on the blade-height adjustment wheel.
8) Bring the blade guard down over the blade.
9) Attach the yellow anti-kickback rollers to the mounting plate and tighten the screws with the Phillips-head screwdriver. It should be situated immediately behind the blade guard.
10) Pull the rip fence away from the blade to allow you to place your wood under the yellow anti-kickback device. Adjust the pressure until it puts up good resistance, but will not require excessive force to push your wood through.
11) Move the rip fence to set it at 3.5 or 4” (dependent on the width of your board.) To do this, loosen the lock lever, bump the fence over with the heel of your hand until the crosshair reads the desired number on the ruler. Lock the fence-lock lever.
12) Adjust the yellow anti-kickback device side-to-side until it is in approximately the middle of the intended cut. It MUST be located to the right of the blade, or it will defeat its purpose.
13) Remove all wrenches and tools from the work area
14) Turn on the power at the circuit breaker.
15) Put on a face shield or safety glasses.
16) Make your cut. Then cut another piece the same width with the remainder.

Proper Form When Ripping Wood on the Table Saw

Make sure no-one is standing or walking behind you.

Stand to the left of the rip fence and slightly to the left of your piece of wood.

Don’t focus your eyes on the blade, but on the juncture between your wood and the rip fence.

Direct solid pressure forward and into the fence.

Never take your hands off your piece of wood; it can and will kick back at you.
When the end of your piece of wood is fully on the table, you may pick up your push stick, without letting go of the wood.

Keep the push stick close to the rip fence and push your wood ALL THE WAY PAST THE BLADE. If you stop pushing before the wood is past the blade, your wood can and will kick back at you. The anti-kickback pawls on the “splitter” will catch your wood, but you don’t want to make them do their job.

Do not attempt to push the “scrap” piece (left-side piece) of wood past the blade. Only push the piece that is against the rip fence.

Do not allow fellow students to “help” you by pulling your wood through at the other end. You are the only one who should be performing this operation. Helpers cause misunderstandings and dangerous situations.

Turn off the saw as soon as you have pushed your wood through.
Let the blade come to a complete stop before collecting your wood.
Read More..

Monday, February 24, 2014

Maple hutch with tutorial for wood finishing

A big thanks to Maryann at Domestically Speaking, for the heads up on the free paint 
last Sat at ACE! Not That I need anymore paint! Seriously, I counted. I have over fifty...yes 50,
containers of paint in all different colors! But, I didnt have this color!! Since it was FREE, and I already have a bazillion colors on hand, I got COBALT! My fave color. I dont have 
anything to paint this shade....yet! Ima lookin. Isnt it yummy??
MAPLE HUTCH

                 The finished product is at the bottom of this post......Dont peek now...scroll on down!!

          Here is my latest project. A pretty nice score from CL. I dont think the owners ever once polished, cleaned or even wiped this baby down! She was pretty grimy!!
       Im going to go over some wood finishing steps while Im working on this project. I have been refinishing wood a lot longer than Ive been painting it.
  I couldnt believe what a beautiful top the lower part of this hutch had. I know, youre looking at it and going, "yeah, right." Just wait.  This hutch is solid maple. I couldnt believe my eyes when I sanded off that stain. Pure, solid maple butcher block.  Even those shelves are solid. I sanded those puppies down as well.
                                 
                                    I will be adding bits to this day by day until Im finished.


Filling in a crack w/some wood filler.


This left leg had a some serious gouges and a chunk missing from the molding. No problem.
I will fabricate the missing piece with Plastic Wood. It dries quickly and sands easily. The benefit over the wood filler is that it will not shrink and crack. For really big fill jobs, use an epoxy filler.


Heres what it looks like after sanding and staining.

 And heres what it looks like after painting! I dont think anyone would have known.
And those deep gouges kind of faded after I hit it with sandpaper.


Ok...So off to the top! 


I start with my orbital sander and a 60 grit, then 150, and finishing with 220.
Go easy around the edges or youll hog em off! I usually do those by hand. 


Um, hello??? Can you say pristine maple?? Like butcher block maple quality???
Its gawjus!  So now comes the fine tuning with a 320 grit that I 
use in a block sander, going with the grain. This gets any circular
marks the orbital may have left behind and really gets it
feeling as smooth as a babys behind! 


I used this pre-stain to avoid blotchiness. 


I sand again (with a 320 or 420 grit)  after applying this because it tends to raise the grain.


Maple takes stain very easily although its difficult
to get very dark. I used a dark walnut, which it sucked right up,
and then went over it again with jacobean. I use a foam brush
to apply it and then a lint free rag to work it in and wipe
off the excess.


Very important to use a seal coat. This locks in your color and gives you a
finish you can sand without stripping your color.  You must sand after this
 and all subsequent applications.  From here on out I use a fine steel wool.


Last night I put on a poly finish in gloss, water based. I have the oil based too, but since
this isnt going to get that much usage, I chose the water. Plus the water base
is easier to brush on and clean-up is with, well, water!  I hate
cleaning oil stain brushes! 

I use a 0000 steel wool. Once the poly dried, I gave the top a once over
with the wooly. Go easy and try to see where the streaks are. Yes, you will
dull the finish. Thats okay cuz you are going to put on at least another
2-3 coats (sanding in between each one). 
You never stop at one coat.  
A lot of work you say??? Why yes, it is. But thats why it will look 
so good when its done! 


This is the inside bottom shelf. I gave it a quick sanding, a once over with some stain and one coat of the poly. 
Im calling it a day on this part. It was in decent shape and I didnt take it down to the bare wood. 
I think it looks beautiful. Look at that rich color! 


Heres a sneak peak at the hutch part. I did the same procedure to the shelves as 
I did on the top. They were the same maple quality. I debated about
painting.  I hate covering up nice wood and I thought the
contrast would work well with colors. 


So I just finished the bottom portion and brought this in
the house. Ive since acquired a new piece and I need
room in the garage! Repeat after me,,,,,,
I have a furniture addiction!


I came across these vintage knobs at the Re-Store.
The pulls came from Lowes. I tried to spray the originals, 
but I didnt like the way they came out. I think these suit the 
hutch better. 

Im so in love with the way this top finished. This is after two coats
of glossy brush on water based Poly. I could probably
use one more coat. 


Ok finally! DUN!  Waxed her up and couldnt find a good place
to put her to take photos. The color of my walls in the other rooms do not
go at all with this hutch. So its in my bedroom by the 
back door! 


In case you forgot the before.....


I used my home made chalk paint on the white. 
Behr "divine pleasure".  The aqua color is regular latex
with about 3 different colors I had on hand mixed together. 


Read More..

Friday, February 21, 2014

woodworking projects for the home

woodworking projects for the home

Dont forget the youngsters when you are in your woodworking projects. There are lots of projects for the children and they will adore you for building these people some. Naturally one of the most common projects for kids may be the cubby house. Just about all kids adore a cubby residence as someplace to get in touch with their own. Wherever they can sit down and make think to their minds content as well as play their particular games. Its going to serve all of them as preschoolers right through to huge kids being a place to escape and hide.The plethora of cubby house designs are all around and you can decide on something because trendy as you wish. It can be one story or even two tale although guarantee the kids are of sufficient age to handle the next story. Materials used is as varied as you would like as well if you like it is possible to build a thing to match the home. The kids would have their very own small house. In order to see the cubby home can be as complex or because simple as you like. It is merely as minimal as your thoughts. All of your building will be in timber so will end up being relatively easy particularly if you get some step-by-step plans and habits. You will have the idea done in almost no time and the little ones will love this.If your students are a bit elderly and you have several suitable timber they enjoy playing in a shrub house. Assemble it as up high as you can get that with a piece of string ladder gain access to. From the woods house use a rope link to another shrub platform plus a flying monk or string swing back to soil. Bigger children will love the task and commit many content hours enjoying pirates or even Tarzan games an excellent source of the timber.Your creativeness here is a good thing. If you are going to create something consequently adventurous find some good input from the kids. Theyre going to soon load you along with ideas of the items they would like to help you formulate a new plan around these. Get some woodworking plans and have some more suggestions. Check out what you wish to build and dont forget, if you are going to place something at any height in a sapling you will be functioning off the ladder and turn into limited as to what you can do. Isnt it about time planted the theory the kids is not going to let you overlook so might get started. Theyll love you because of it.
free home woodworking projects

Read More..

Wood Working Plans What Wood Should You Use For Your Wood Working Projects

You have your wood working plans for the wood working project you have decided to build, now all you need is some wood, glue, fasteners, a few tools and you are off and running.

Wood is wood, right? Well it depends on where you are in the world, it could be lumber or timber. Then there is MDF (medium density fibreboard), Chipboard, Plywood, Particle board, hardboard and a whole host of other variants of reconstituted wood chips, laminated boards and beams.


TedsWoodworking Plans and Projects

To start with, lets just take a look at "real wood".

  • Real Wood

Now that you have your wood working plans for a project you have decided to build, what wood do you need?

The answer to that is - it depends, not very helpful you might think, but it really does depend on what you are making so lets see if we can point you in the right direction.

For many of my wood working projects real wood is often my first choice but not always. Like I said thats lumber or timber, there is a huge variety of tree types which vary enormously in their properties and costs but essentially they are categorised into softwood and hardwood.

  • Softwood

Softwood is wood from the conifer variety of trees and includes cedars, Douglas-firs, cypresses, firs, junipers, kauris, larches, pines, redwoods, spruces, and yews.

Surprisingly enough softwoods are not necessarily softer than hardwoods, there is a wide variation in hardness in both groups. Generally, softwood is easier to work with than hardwood.

Softwood is used a great deal in the building industry for structural timber, for making furniture, wood pulp and paper. For many of the wood working projects that you may be considering, Cedar and Pine for example are good choices.

From an environmental perspective softwood is easier to replenish than hardwood, taking less time to grow to usable sizes and is grown in large forests around the world. Because of the tree shapes they can be grown closer together, so you get a higher density of timber per acre or hectare.

  • Hardwood

The density in hardwoods has a broad range and encompasses that of softwoods. There are some hardwoods (such as balsa) which are softer than most softwoods, while yew is an example of a hard softwood. The hardest hardwoods are much harder than any softwood. There are hundred times as many hardwoods as softwoods.

Varieties of hardwoods include ash, beech, boxwood, cherry, ebony, holly, mahogany, maple, oak, teak and walnut. There are many other varieties. Many hardwoods have intricate grain patterns like walnut, some are used for special applications such as veneers.

Quality furniture and fittings in your home are often made from hardwoods. There is a cost penalty though, hardwoods generally, are more expensive than softwoods.

  • Wood Quantities

Most wood working plans will have a list of timber required but, check actual measurements. You will need to make allowances in your wood working projects for variations in your timber. Timber has a water content and shrinks as it dries. Some kiln dried timber is available but it will be considerably more expensive. Dressed (or finished) timber can vary in sizes a small amount.

Some timber is better suited to outdoor projects than others. For special applications, some timber is chemically treated.

If you are in any doubt just ask at your local lumber (timber or wood) yard and they will usually be happy to give you advice.

So choose your wood, open up your wood working plans and get your wood working project underway.

If you like more reading Check Teds Wood Working.
Read More..

Sunday, February 16, 2014

projects for woodworking

projects for woodworking


Woodworking has been around for a, long time. How can you think your wheel obtained invented? There are many people across the nation, with back garden woodworking sheds, generating everything from Hen Houses in order to Windmills, Stogie Humidors to Outdoor storage sheds, Wooden Recliners to Veranda Swings. The options are unlimited. Easy-to-build projects for woodworking can be purchased through guides or in products that you can get at home Depot, Lowes or even any number of spots on the Internet.

Beginning wood workers can use these kind of kits to be able to kind of get yourself a feel for woodworking along with learn the essentials of what is essential, as far as resources go etc. Start small as well as work straight into more detailed as well as larger projects when you gain self-confidence. Plans are essential, there are a lot of locations where you can prepare yourself made plans for just about any number of different projects. The whole process of making a thing with wood, be it functional or perhaps something to think about should be done using a plan. It is possible to change the proportions around somewhat if you want that bigger as well as smaller, though the plan assists you to know exactly where youre going along with what to do up coming.

You can always develop your own plans. Simply find one thing you want to help make, such as a refreshments table as an example, and have a tape measure as well as a note pad and also copy that. Take thorough photos of computer too, in order to refer time for it as your house it. I did that many occasions. Woodworking lets you believe as you construct and try what youre developing to make the project even better. Greater projects and pieces you create, the more seasoned you will turn out to be. Finding the right projects to work with will become 2nd nature, since will following plans when youre doing work in your look.

projects for woodworking plans
easy projects for woodworking

Read More..

Thursday, February 13, 2014

Bench for Teague


Well, its been a little crazy around here lately. Between the general chaos of the end of another middle school year, and shopping for a new vehicle, I havent had much time, or energy for the shop. But Teagues first bithday was last week, and I did suceed in making him a special present.


A skunk bench for a little stinker!


Read More..

Wednesday, February 12, 2014

This is a really cool idea for making some extensions for your Irwin Quick Clamps


Read More..

Monday, February 10, 2014

Where to get easy Woodworking Plans for Beginner

It doesnt seriously matter if youve practiced woodworking for many years or if youre still a beginner, you can always have use for those easy woodworking plans. It will be much easier for you to end your projects if you stick to easy woodworking plans and I likely dont have to mention that it is critical to check out the exactness of the plan when you start working.

Its all up to you where you want to opt for your woodworking plans. You can find hundreds of them on the internet but not all of them are precise. Its more likely that youll get a great plan for your new project if you consult a book about the woodworking craft. A membership for a woodworking magazine might help you a lot too. Internet is a good source for many things and its a good place when you want to learn articles and study much about a specific subject, like woodworking, but its not the ideal place when you want to get easy woodworking plans.

It is crucial that youre aware of the fact that it will be possible for you to make several actually good pieces of furniture even if youre following easy woodworking plans. You can do a rocking arm chair or a good bureau if you would like and it doesnt have to be as difficult as it might seem. You should know that its not easy to be a talented and skillful craftsman even though and you will need to practice a lot if you want your furniture to look good.

Woodworking doesnt should be your career, you can have it as a hobby too. If you practice much you will be able to make most the furniture thats needed in a home and that can help you and your family to save lots of money since you wont should get all the high priced pieces of furniture in a store.

When youve done a few projects you might want to try more difficult plans and thats okay but you should always remember easy woodworking plans can be used even if you want a great final result. Its your work that matters. You can also come up with your own plans if youre skillful enough to figure out how to do it. That creates the craft of woodworking much more exciting definitely.

woodworking project plans

Read More..

Monday, February 3, 2014

This Week Woodworking plans for a drafting table

For you Woodworking plans for a drafting table must try

Woodworking Plans For A Drafting Table

Free woodworking plans tables, cad files for woodwoworkers, Free woodworking plans - tables, cad files format dwg, dxf and more. do you have free cad woodworking files you want to share? let us know!. Wood drafting tables & desks wooden tables for drawing, Wooden drafting tables & desks wood tables designed for artist, drawing & drafting wood drafting tables: wooden tables and wood tables with white tops.. Drafting a staffing plan for your organization, Uvm extension’s building capacity project: drafting a staffing plan issued in furtherance of cooperative extension work, acts of may 8 and june 30, 1914, in.

Drafting table plans - hubpages, Learning how to make a drafting table is one thing. knowing how to make drafting table plans is another. having an idea on how to draw drafting table plans is an. Woodworkers workshop - free woodworking plans information, Free woodworking plans and projects search engine. top searches include free woodworking plans for easter, christmas, valentine, picnic, free, router tables, gun. Diy plans for building a dining table | ehow, Diy plans for building a dining table. a dining table is the focal point of any dining room. its size dominates the area, and its style dictates the style of the rest.

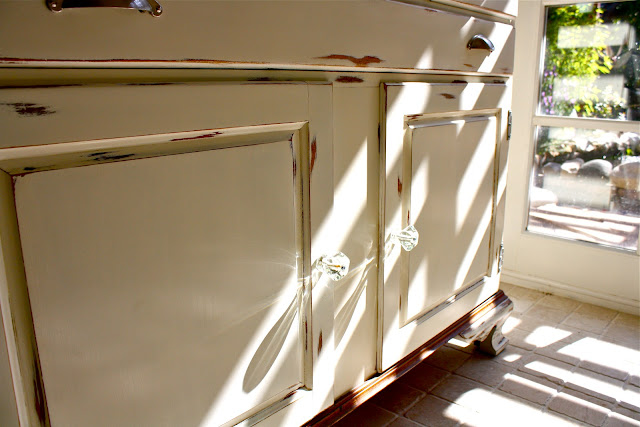
How to build a wood makeup vanity table | ehow, How to build a wood makeup vanity table. putting on makeup or fixing hair at a vanity table is easier than standing in front of a bathroom sink or dresser.. Ana white | build a large wood pet kennel end table | free, Still such a necessity in our lives, this dog kennel is both a tabletop surface and home for our puppy. we choose to leave the kennel unfinished because puppies tend. A precise method for drawing an ellipse - fine woodworking tip, An excellent and common method for drawing an ellipse is to use two push pins, a string, and a pencil. trial and error is often recommended as the way to adjust the.


#1: Woodworking plans for a drafting table must see


Woodworking plans for a drafting table
,

8.5 out of 10 based on 12 ratings
Read More..

Sunday, February 2, 2014

Guide wooden gift idea for him

Useful wooden gift idea for him Best choice

Wooden Gift Idea For Him

Cool gifts for guys, best gift ideas for him | uncommongoods, Find the best gift ideas for men, women and kids at uncommongoods. we carry thousands of cool gifts, from fun jewelry and accessories to creative home decor and. Wood gifts,wedding anniversary wood gifts,wooden keepsake, Wood gifts,wedding anniversary wood gifts,wooden keepsake boxes,5 year wedding anniversary wood gift,wood personalized gifts,where can i buy wood gifts. Gifts for men, gifts for him & gift ideas for men, From toiletry cases to vintage decanters, you'll find just the right gifts for him at pottery barn. browse gifts for men now..

Men's gifts | unique gifts for him at redenvelope, Redenvelope is your destination for unique and high quality gifts for men. no matter his taste, you'll find that perfect gift for him. fast shipping.. Gifts for him | gonedigging for personalised gifts, Find gifts for him with our huge range of personalised and unusual presents for men. from adrenaline fuelled days out, to a gift that will make him smile.. Gifts for men - presents & gift ideas for him | ftd, Find great gift ideas for men like gourmet snacks, sweets, and more. whether you're looking for something for your husband, father, brother, or friend, discover the.

Executive gift shop - gift ideas for men| personalized, Specializing in personalized executive and groomsmen gifts.. Gift ideas for men - anniversary, Unique gift ideas when shopping for men. starting point for your husband on a wedding anniversary, birthday, father's day, or christmas!. Unique gifts for husband, best ideas for him | uncommongoods, Find the best gift ideas for men, women and kids at uncommongoods. we carry thousands of cool gifts, from fun jewelry and accessories to creative home decor and.


For you wooden gift idea for him one of the best


wooden gift idea for him
,

9 out of 10 based on 23 ratings
Read More..

Tuesday, January 21, 2014

Now is woodworking for mere mortals

Useful woodworking for mere mortals must see

Woodworking for mere mortals: free woodworking videos and, Free woodworking plans. easy woodworking projects. fun woodworking videos. woodworking for mere mortals.. Woodworking for mere mortals: free woodworking videos and, Free woodworking plans. easy woodworking projects. fun woodworking videos. woodworking for mere mortals..

 | Woodworking For Mere Mortals Episodes | How To Videos | Blip

Woodworking for mere mortals: free woodworking videos and, Free woodworking plans. easy woodworking projects. fun woodworking videos. woodworking for mere mortals.. Steve ramsey - youtube, Ever think about making something out of wood? you can! woodworking for mere mortals is dedicated to making woodworking easy and fun. new woodworking video e.

Steve ramsey - youtube, Ever think about making something out of wood? you can! woodworking for mere mortals is dedicated to making woodworking easy and fun. new woodworking video e. Make an easy wood whirligig - youtube, Here's a very basic whirligig. if you would like to try to make this one, here is a pdf containing templates: https://docs.google.com/open?id=0byv0. Wood-splitter-lee (self taught sculptor) on deviantart, Art - community of artists and those devoted to art. digital art, skin art, themes, wallpaper art, traditional art, photography, poetry / prose. art prints..

Woodworking for Mere Mortals Mug by meremortalsshop


Woodworking for Mere Mortals Mug by meremortalsshop

Mere Mortals Shop Apron > Woodworking for Mere Mortals - The Store


Mere Mortals Shop Apron > Woodworking for Mere Mortals - The Store

 | Woodworking For Mere Mortals Episodes | How To Videos | Blip


| Woodworking For Mere Mortals Episodes | How To Videos | Blip


#1: woodworking for mere mortals


woodworking for mere mortals
,

9 out of 10 based on 21 ratings
Read More..