Monday, February 24, 2014
Maple hutch with tutorial for wood finishing

A big thanks to Maryann at Domestically Speaking, for the heads up on the free paint
last Sat at ACE! Not That I need anymore paint! Seriously, I counted. I have over fifty...yes 50,
containers of paint in all different colors! But, I didnt have this color!! Since it was FREE, and I already have a bazillion colors on hand, I got COBALT! My fave color. I dont have
anything to paint this shade....yet! Ima lookin. Isnt it yummy??

MAPLE HUTCH
The finished product is at the bottom of this post......Dont peek now...scroll on down!!
Here is my latest project. A pretty nice score from CL. I dont think the owners ever once polished, cleaned or even wiped this baby down! She was pretty grimy!!Im going to go over some wood finishing steps while Im working on this project. I have been refinishing wood a lot longer than Ive been painting it.
I couldnt believe what a beautiful top the lower part of this hutch had. I know, youre looking at it and going, "yeah, right." Just wait. This hutch is solid maple. I couldnt believe my eyes when I sanded off that stain. Pure, solid maple butcher block. Even those shelves are solid. I sanded those puppies down as well.
I will be adding bits to this day by day until Im finished.


Filling in a crack w/some wood filler.


This left leg had a some serious gouges and a chunk missing from the molding. No problem.
I will fabricate the missing piece with Plastic Wood. It dries quickly and sands easily. The benefit over the wood filler is that it will not shrink and crack. For really big fill jobs, use an epoxy filler.
  Heres what it looks like after sanding and staining.  And heres what it looks like after painting! I dont think anyone would have known. And those deep gouges kind of faded after I hit it with sandpaper.  |
| Ok...So off to the top! I start with my orbital sander and a 60 grit, then 150, and finishing with 220. Go easy around the edges or youll hog em off! I usually do those by hand.  Um, hello??? Can you say pristine maple?? Like butcher block maple quality??? Its gawjus! So now comes the fine tuning with a 320 grit that I use in a block sander, going with the grain. This gets any circular marks the orbital may have left behind and really gets it feeling as smooth as a babys behind!  I used this pre-stain to avoid blotchiness.  Maple takes stain very easily although its difficult to get very dark. I used a dark walnut, which it sucked right up, and then went over it again with jacobean. I use a foam brush to apply it and then a lint free rag to work it in and wipe off the excess.  Very important to use a seal coat. This locks in your color and gives you a finish you can sand without stripping your color. You must sand after this and all subsequent applications. From here on out I use a fine steel wool.  Last night I put on a poly finish in gloss, water based. I have the oil based too, but since this isnt going to get that much usage, I chose the water. Plus the water base is easier to brush on and clean-up is with, well, water! I hate cleaning oil stain brushes!  I use a 0000 steel wool. Once the poly dried, I gave the top a once over with the wooly. Go easy and try to see where the streaks are. Yes, you will dull the finish. Thats okay cuz you are going to put on at least another 2-3 coats (sanding in between each one). You never stop at one coat. A lot of work you say??? Why yes, it is. But thats why it will look so good when its done! This is the inside bottom shelf. I gave it a quick sanding, a once over with some stain and one coat of the poly. Im calling it a day on this part. It was in decent shape and I didnt take it down to the bare wood. I think it looks beautiful. Look at that rich color!  Heres a sneak peak at the hutch part. I did the same procedure to the shelves as I did on the top. They were the same maple quality. I debated about painting. I hate covering up nice wood and I thought the contrast would work well with colors.  So I just finished the bottom portion and brought this in the house. Ive since acquired a new piece and I need room in the garage! Repeat after me,,,,,, I have a furniture addiction!  I came across these vintage knobs at the Re-Store. The pulls came from Lowes. I tried to spray the originals, but I didnt like the way they came out. I think these suit the hutch better.  Im so in love with the way this top finished. This is after two coats of glossy brush on water based Poly. I could probably use one more coat.  Ok finally! DUN! Waxed her up and couldnt find a good place to put her to take photos. The color of my walls in the other rooms do not go at all with this hutch. So its in my bedroom by the back door!  In case you forgot the before.....   Behr "divine pleasure". The aqua color is regular latex with about 3 different colors I had on hand mixed together.    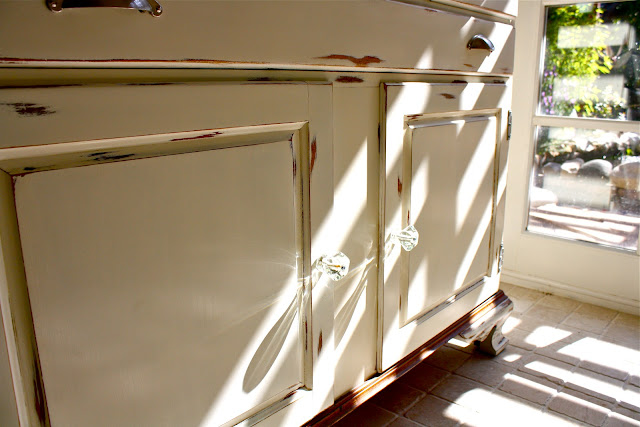   |

Subscribe to:
Post Comments (Atom)
No comments:
Post a Comment