Showing posts with label the. Show all posts
Showing posts with label the. Show all posts
Wednesday, March 5, 2014
Contemplating the Chimney

Thats me standing in the machine room right in front of the new doors... but before any of that happens I have to smash out that darn chimney!
Sunday, March 2, 2014
The Story of a Country Kitchen

I hope you had a wonderful Easter weekend. Today Im sharing our kitchen makeover. As usual, I debated on whether or not to share this since in my mind our kitchen isnt quite finished. (I always refer to our house as a "work in progress".) But the fact is it probably will stay like this for a while, because when you have an old house that needs work, its all about priorities!
The reason I decided to share this is because we actually did this makeover on a budget of $1000. I always feel like paint is the most affordable way to completely make over a room and painting kitchen cabinets are a perfect example. The other ways to affect a remodel on a budget are to be resourceful, use existing elements if possible, prioritize those things you feel are worth the extra money and finally, do the work yourself!
BEFORE:

This is how the kitchen looked when we did a walk-through on the house. Can you believe that I lived with it like this for almost a year? But it was almost exactly a year ago (I was 6 months pregnant at the time) that we were ready to tackle the kitchen!

Believe it or not, we did the majority of the work one Saturday. My daughter spent her first night away from home with her grandma and we worked all day and some of the night. I did all of the painting while Justus took care of trim work, light fixtures, and other time consuming details.
I had never painted cabinets before (in our previous house we purchased new cabinets when remodeling our kitchen) and I was very nervous. But there was really no reason to replace these cabinets. Sure, they were ugly, but these cabinets were as solid as could be, made with thick oak wood.
I visited our local Benjamin Moore store and they helpfully pointed me in the right direction as far as what kind of primer to purchase and a cabinet paint roller. The $6 for the cabinet paint roller was worth every penny! (smile) I originally wanted to use an oil-based primer, but since I was pregnant at the time, we went with latex. I painted one coat of primer and three coats of paint.
AFTER:

I used the same color for the cabinets and walls (Simply White by Benjamin Moore). Since our kitchen is on the small side, I knew white would not only brighten the space, but also make it appear larger.

If youve read about our butcher block countertops, then you know they are something I have always wanted. The warmth of wood looks beautiful with an all white palette. These countertops are my favorite thing in our kitchen. They were made by my husband and father-in-law from 100-year-old reclaimed barn wood (you can read more about them here).

We were fortunate that the countertops were essentially free since my father-in-law had the wood and tools needed to build the countertops on hand. The countertops are an example of being resourceful though... sometimes unique and lovely things can come about when you have to think outside the box.
BEFORE:
BEFORE:

When we purchased our house, the original bead board was covered with foam tiles. Justus and I had no idea what the condition of the bead board would be in when he removed the tiles. He did the laundry room and kitchen at the same time and we were pleasantly surprised that although the bead board was covered in pealing old teal paint and had a few holes, it was in a salvageable condition. This was a very dirty project and Justus did it all himself since I was pregnant and we knew we were potentially dealing with lead-based paint. He shut off this section of the house for a day and wore a face mask when sanding and making repairs. He then added a coat of primer and a coat of paint before opening this section back up. I added three more coats of paint after that to ensure everything was sealed properly and would be for several more years.
AFTER:
AFTER:

By renovating the ceiling, we were able to raise the ceiling height by a good 4". This was a very positive thing since the back portion of our house originally was a porch (before there was such a thing as indoor plumbing) and has a lower ceiling height than the rest of the house. Justus added trim on top of the cabinets for a finished look.

The farmhouse sink is also original to the house and fortunately is in excellent condition. We did replace the faucet and spent about $200 on it I believe. I purchased the cabinet hardware off of Ebay for about 1/3 of the price of what we would have spent somewhere like Lowes. We also replaced the dishwasher.

The white bead board cabinet is something I found prior to purchasing our home and I use it for a pantry (you can read more about it here).

Later I purchased this wood piece at a local antiques store and I use it for extra storage since we have a limited number of cabinets. I love both pieces in the kitchen since I feel like they must have been made around the same time period as our house and the bead board gives a cohesive look.
BEFORE:

AFTER:

This view is looking into the laundry room and then a bathroom. Eventually well replace the floors in this portion of the house to match the rest of the downstairs. We left the walls as they were because the bead board behind didnt appear to be in good condition from what we could see and although this is a type of paneling, it is solid wood about 1/4" thick. And actually I feel like a little variation from bead board is okay... our entire house is bead board!

I found this farmhouse table for something like $40 and refinished it. We love this old table and even though were a little crowded, we usually eat our family meals here instead of the dining room.

Some day well replace the refrigerator and stove, but for now, these work fine.

Although our kitchen is by no means perfect, its cheerful, charming and the heart of our home. I dont feel like you have to spend a lot of money to bring about some major improvements. We have some ideas in mind for additional improvements, but with an old house, a budget, and limited time, you learn to prioritize home repair projects and be content until the time is right.
And although I do try to keep our kitchen clean and uncluttered, I have to be honest... I normally have a high chair with an occupant in one corner...

And my refrigerator is always packed with sweet artwork. (smile)

For fun, here is a list of what we purchased for our kitchen makeover with approximate prices:
- Paint $100
- Cabinet Roller $6
- Trim $75
- Faucet $200
- Cabinet Hardware $85
- Light fixtures and covers $150
- Dishwasher $400
Monday, February 24, 2014
Another dresser re do like the crack house dresser
I was surprised at the interest in the crack-house dresser that I had painted. I had listed on CL and got quite a few calls. I even had multiple buyers for it on the same day. The person asked me if I was going to be doing any more like it. So, when I came across these two siblings, I thought I could paint one in the same fashion. So I did! 
Like my garage??? 3 dressers (four if you count the one you cant see) a hutch and a buffet....all awaiting my time. Yeah, ok, sure...Ill get right on that. The two siblings are on the left with the oh-so fetching coat of arms brand-thing is what Im working on. The one below is the smaller of the two. I dont even know what that green/yellow monstrosity is, even the owner didnt know what it was.

All I know was that it had to go bye-bye. Some wood filler and a good sanding, and away it went.

So...here it is,,,,crack-house dresser paint #2!
This one was in far better shape. I refinished the top and shined up all the brass hardware.


The Hub polished up all the hardware on his polisher. Almost looks as though they brass plated copper!


I thought this fabric went perfectly with the colors.


Linking up to all my faves, see below......plus http://www.myrepurposedlife.net/</a>
Friday, February 21, 2014
woodworking projects for the home
 |
| woodworking projects for the home |
Dont forget the youngsters when you are in your woodworking projects. There are lots of projects for the children and they will adore you for building these people some. Naturally one of the most common projects for kids may be the cubby house. Just about all kids adore a cubby residence as someplace to get in touch with their own. Wherever they can sit down and make think to their minds content as well as play their particular games. Its going to serve all of them as preschoolers right through to huge kids being a place to escape and hide.The plethora of cubby house designs are all around and you can decide on something because trendy as you wish. It can be one story or even two tale although guarantee the kids are of sufficient age to handle the next story. Materials used is as varied as you would like as well if you like it is possible to build a thing to match the home. The kids would have their very own small house. In order to see the cubby home can be as complex or because simple as you like. It is merely as minimal as your thoughts. All of your building will be in timber so will end up being relatively easy particularly if you get some step-by-step plans and habits. You will have the idea done in almost no time and the little ones will love this.If your students are a bit elderly and you have several suitable timber they enjoy playing in a shrub house. Assemble it as up high as you can get that with a piece of string ladder gain access to. From the woods house use a rope link to another shrub platform plus a flying monk or string swing back to soil. Bigger children will love the task and commit many content hours enjoying pirates or even Tarzan games an excellent source of the timber.Your creativeness here is a good thing. If you are going to create something consequently adventurous find some good input from the kids. Theyre going to soon load you along with ideas of the items they would like to help you formulate a new plan around these. Get some woodworking plans and have some more suggestions. Check out what you wish to build and dont forget, if you are going to place something at any height in a sapling you will be functioning off the ladder and turn into limited as to what you can do. Isnt it about time planted the theory the kids is not going to let you overlook so might get started. Theyll love you because of it.
 |
| free home woodworking projects |
The 4 Important Steps of How to Build a Chicken Coop

When you build a chicken coop, there are four main elements that you want to keep in mind. We will cover them in this article, and when youre finished you will be ready to move onto the next step, getting the plans and breaking out the power tools.
The first step we will cover is size. This has a direct effect on the number of birds you can hold and is often one of the first mistakes beginners make. After that you will be able to pick out the style that best suits your needs and the amount of space you have.
Once you have this information, you will want to look at building both a healthy and safe coop. More on that in a moment.
Lastly you will want to make sure that you build a nice looking hen house. But you may be surprised when you find out how important this step really is.
Some of you may already be itching to break out the power tools, so I will get started and show you how to build a chicken coop.
Step #1: Picking the Right Size
You may be thinking that this is an understood part of building a chicken coop. You know where you want to put the chicken coop and you know how many chickens you want, isnt that enough? The answer is no. Just because you have a spot picked out, that doesnt mean it is the most ideal. You may also run into trouble if your desired hen house doesnt match the number of chickens you plan to get.
Each chicken requires at least 3 square feet of room inside of the chicken coop. As you can see, this will directly influence how many chickens you can hold, and where you can build your coop.
As you can imagine, if the chicken coop becomes too crowded, your hens will spend the majority of their time fighting for room rather than laying eggs. Since this is the reason, most people build chicken coops, it will waste both the money and time youve invested. So now is the perfect time to decide how many chickens you plan to raise.
In the event that there is too much room in the coop later you always have the options to add another hen or two.
Step #2: Choosing the Right Type of Chicken Coop
As you already might know, there are two types of chicken coops. The first is portable, and is often referred to as a chicken tractor. The other is fixed and is usually built to hold more chickens. Lets look at the two types and you can get a better idea of what best suits your needs.
First well look at the portable ones. There are several benefits to building a portable chicken coop, besides being portable they are easier to maintain. Since you can move the coop around, maintenance is much easier. Instead of bringing the tools to the coop, you can bring the coop to your tools. Cleaning the coop is also easier with portable hen houses.
But there is a downside, and we need to cover that as well. If you build a portable chicken coop, dont expect it to last for a long time. Portable chicken coops are not nearly as stable as their fixed counterpart.
Fixed or static hen houses are much more stable than the portable ones, and a well built coop can last for many years. Of course you need to plan the location for your coop very carefully. Once it is finished, moving it will be a very time consuming process.
Here are some things to consider when you build a static roost. First, chickens need a lot of sunlight. Make sure to build the chicken coop so that it gets as much sun as it can each day. But you will also want provide your coop with protection from the other elements. Strong rain or wind can be a problem, thats why it is a good idea to build your coop under a group of trees or next to a larger building.
Another thing to keep in mind when you build a fixed hen house is that it shouldnt be built on low ground. Make sure to build it on the a higher part of your yard. If you get strong storms, your chicken coop could become flooded. If this happens, you learn what the expression "madder than a wet hen" means.
Step #3: Keeping Your Coop Safe
One of the most important aspects of learning how to build a chicken coop is keeping your birds safe.
There are many different types of predators that will prey upon your hens if you arent careful. This can be anything from the neighborhood cats and dogs to less likely threats such as rats. If you live in the country, you may also be at risk of attracting larger predators.
These can include foxes, coyotes and badgers. You will want to assure that you use strong enough fencing to keep the more determined wild animals out. Make sure to bury your fence deep enough in the ground to keep out animals that try to dig their way into the coop.
Dont forget the threat from above. Hawks will also prey upon chickens, so it might be necessary to cover your chickens run with a roof or fencing.
Step #4: Keeping Up Appearances
Learning how to build a chicken coop can be a really fun experience which also makes a great family project.
A well built chicken coop should be both healthy and comfortable for your chickens but also look nice. Nobody likes an eyesore, and if you dont take the time to finish out your coop, you might get complaints rather than compliments from your neighbors.
This would be a shame, since a chicken coop can add a unique element to your yards landscaping. One that will have your neighbors talking for all of the right reason, and your family supplied with fresh eggs every morning for breakfast.
If you build your chicken coop in the city, you will want to check your city ordinances for any that regulate if and how you can build your coop.
Read More Chicken Coop Plans Here
Thursday, February 20, 2014
Making a Coffee Scoop Small Diameter turnings the Walnut Bowl is done
Good Morning Everyone,
I got up early today and re-started the coffee scoop project. Heres how it went:
I decided to remake the wooden base for the pvc collet chuck. The original one was made out of pine and it didnt look nearly strong enough to withstand the shearing forces produced by a lathe. So I discarded it and remade it out of some red birch:

Since it was rather rough on the edges, I decided to round it down and promptly broke it:

Good grief. Since the rest of it was in one piece, I decided to use it temporarily as a holder while I worked on the pvc portion of the chuck. I inserted the pipe into the slot on the birch base and placed another piece of wood on top of the pvc pipe and placed the whole thing between centers to mark and drill it:

The walls of the pipe will have slots cut into them and also a large hole-slot drilled and cut into it to allow the handle of the scoop to protrude while the piece is being turned. So I marked and drilled and cut into the sides of the pipe with a drill and a hack saw:


And here is a photo of the completed chuck with the hose clamp in place:

With that done, I removed the broken base and re-made it out of a piece of solid maple. Here is a photo of the completed chuck:

I glued the pipe and the base together and they are drying in the shop.
Meanwhile, back at the ranch, I turned our red oak scoop blank down more:

Hmmm...now it looks like a small lemon on a stick and the reason it does is that the x, y, z axis of the piece are not equal in length, or in other words, it isnt round yet. So back to the lathe we go for more turning, sanding and finally I cut it off:

...too soon. Its too large to fit into the pipe. So Im going to manually cut down the ends of the blank until it fits. Oh well, its a nice morning to work outside.
Now it fits, very tightly, but it fits:

When this is placed back on the lathe in a couple of hours, I will shave off the top of the scoop and then hollow it out. If all goes well, I should wind up with a scoop with the handle attached. The glue really needs to dry hard so Ive removed the blank and Ive set it aside. Ill go back to it later this afternoon.
In the meantime, I finished the first walnut bowl. Here it is:

And here is a side shot:

Its been polished and its ready for delivery. Ill have to plug the holes in the base where the screws for the faceplate were drilled but that will only take a minute. Im going to go and email the happy owner.
Ill be doing another posting later today so stay tuned.
VW
Read More..
I got up early today and re-started the coffee scoop project. Heres how it went:
I decided to remake the wooden base for the pvc collet chuck. The original one was made out of pine and it didnt look nearly strong enough to withstand the shearing forces produced by a lathe. So I discarded it and remade it out of some red birch:
Since it was rather rough on the edges, I decided to round it down and promptly broke it:
Good grief. Since the rest of it was in one piece, I decided to use it temporarily as a holder while I worked on the pvc portion of the chuck. I inserted the pipe into the slot on the birch base and placed another piece of wood on top of the pvc pipe and placed the whole thing between centers to mark and drill it:
The walls of the pipe will have slots cut into them and also a large hole-slot drilled and cut into it to allow the handle of the scoop to protrude while the piece is being turned. So I marked and drilled and cut into the sides of the pipe with a drill and a hack saw:
The black lines are the cutting lines:
And here is a photo of the completed chuck with the hose clamp in place:
With that done, I removed the broken base and re-made it out of a piece of solid maple. Here is a photo of the completed chuck:
I glued the pipe and the base together and they are drying in the shop.
Meanwhile, back at the ranch, I turned our red oak scoop blank down more:
Hmmm...now it looks like a small lemon on a stick and the reason it does is that the x, y, z axis of the piece are not equal in length, or in other words, it isnt round yet. So back to the lathe we go for more turning, sanding and finally I cut it off:
...too soon. Its too large to fit into the pipe. So Im going to manually cut down the ends of the blank until it fits. Oh well, its a nice morning to work outside.
Now it fits, very tightly, but it fits:
When this is placed back on the lathe in a couple of hours, I will shave off the top of the scoop and then hollow it out. If all goes well, I should wind up with a scoop with the handle attached. The glue really needs to dry hard so Ive removed the blank and Ive set it aside. Ill go back to it later this afternoon.
In the meantime, I finished the first walnut bowl. Here it is:
And here is a side shot:
Its been polished and its ready for delivery. Ill have to plug the holes in the base where the screws for the faceplate were drilled but that will only take a minute. Im going to go and email the happy owner.
Ill be doing another posting later today so stay tuned.
VW
Thursday, February 13, 2014
Bookcases Project The Shelves
Cant sleep, so Ill do another bookcases post.
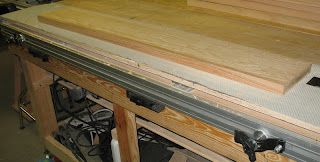
I had to design the cases to fit an existing space between an outside wall with a door close to the wall the cases were going on, and a fireplace. There was also a doorway in the wall that was not centered. As a result, the two sides are different widths. The right side is about 51" wide and the left 42". That made the shelves on the right about 48" wide and that is a bit long for a simple shelf that will hold books. After considering various shelf designs, I settled on a torsion box design that would be light weight, but not too thick, and would be more than stiff enough to prevent sag.
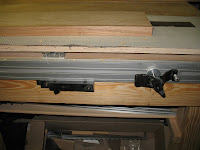
I had two cauls (from Woodpecker) long enough clamp the edges of the shelves, but needed four more to be able to clamp the top and bottom surfaces. Couldnt buy more since they were "One Time" tools, so I just made some out of 2x4s. I wound up using two of the cauls along with a piece of 2x6 to make a jig that the shelves would be built and clamped upon. This came about from building the prototype and finding clamping the whole thing to be an exercise in frustration. The jig made assembly and clamping much easier.
I first laid out the ribs and ends on the jig so they could be tacked together with my pin gun.
I then waxed the skin to prevent glue from messing it up for staining. Wont do that again with oak ply, as it is not easy to get it all out of the pores when you clean it with alcohol. The wood stained okay, but the problem showed up when finishing with the oil-modified-water based poly I use. I even sealed first with a de-waxed shellac, but still had a lot of orange peel that had to be scraped and refinished several times. If I ever do it again, Ill use packing tape to keep glue off, like I did on the wooden cauls.

The skin was placed on the jig with the waxed side down, glue was applied to the parts and they were laid out on the skin. Then the glue was applied for the other skin, and the skin slid in place under the clamp that was used temporarily to hold the edges together.

With that, the cauls and clamps were added and left on over night.


Next the shelf was cut to size, as I made them longer and wider than required. I then used a scraper to clean up any saw marks on the edges. A couple of stops to act as supports and two clamps in the SME on the edge of my bench made holding the shelf easy.


All that was left was trimming the edges down to the skin surface, sanding, staining, and finishing.

Read More..
I had to design the cases to fit an existing space between an outside wall with a door close to the wall the cases were going on, and a fireplace. There was also a doorway in the wall that was not centered. As a result, the two sides are different widths. The right side is about 51" wide and the left 42". That made the shelves on the right about 48" wide and that is a bit long for a simple shelf that will hold books. After considering various shelf designs, I settled on a torsion box design that would be light weight, but not too thick, and would be more than stiff enough to prevent sag.
 | ||
| Drawing of shelf with top skin removed. |
 |
| The jig, cauls and some of the clamps ready to start making a shelf. |
 |
| Ribs and ends laid out. |
 |
| Tacking with the pin gun. |
The skin was placed on the jig with the waxed side down, glue was applied to the parts and they were laid out on the skin. Then the glue was applied for the other skin, and the skin slid in place under the clamp that was used temporarily to hold the edges together.
With that, the cauls and clamps were added and left on over night.
Next the shelf was cut to size, as I made them longer and wider than required. I then used a scraper to clean up any saw marks on the edges. A couple of stops to act as supports and two clamps in the SME on the edge of my bench made holding the shelf easy.
The final post gives a little background of the project and explains some of the decisions made.
Subscribe to:
Posts (Atom)